
India can be roughly divided into 2 zones, the rice eating South and the Wheat eating North. Wheat has been cultivated in India, primarily in the northern and western states since prehistoric times and the ancient Vedic texts give many references to "godhuma", wheat in Sanskrit.
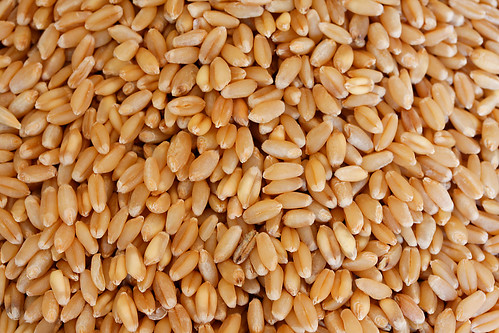
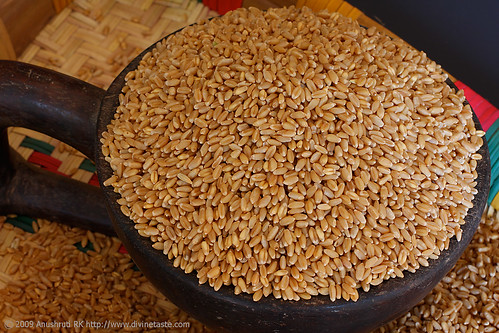
The whole wheat kernel consists of 3 parts, the germ that forms the centre or core of the seed, the endosperm, which surrounds the germ, and the bran which surrounds the endosperm by forming a protective layer. The bulk of wheat production in India is processed in 3 ways. The whole wheat kernel (the germ, endosperm and bran) is finely ground into atta (used for making rotis, parathas, pooris, phulkas and other whole meal preparations), refined wheat flour or maida (used for preparing sweets, savouries, snacks, pastries and certain breads like nan and roomali roti) and semolina or sooji (used for making sweets like halvas and breakfast items like upma). Wheat is also cracked to make cereals like dalia and noodles like seviya.
Wheat is the most widely cultivated crop around the world and the aphorism bread is the staff of life couldn't be more true in the Indian sense. Flat breads are made fresh everyday, from a simple dough made with whole wheat flour and water, rolled into circles and cooked on stove tops. Sometimes the dough is mixed with chopped herbs, cheese and spices or stuffed with vegetables. This would be an everyday affair in most Indian homes. A combination of different flours, interesting shaping methods and various cooking methods like griddle baking, shallow frying, deep frying or cooking directly on various sources of heat produce wholesome, nutritious and delicious fresh breads.
For a nourishing food experience coupled with flavour, taste and texture, try and eat a roti by tearing a small piece off the roti, wrap it around a dry or gravied vegetable or dal and plop it into your mouth.
The key to getting good rotis is by getting the dough right, which can be done by hand or with the help of a food processor or stand mixer. The dough can be soft, medium or stiff. A stiff dough needs to be kneaded and rested longer and a soft dough needs expert hands to work with. My Marwari neighbour in Mumbai makes a super soft dough and my mother's Punjabi friend makes a stiffer dough in comparison to her and both make wonderful rotis. I still recall the day when I visited my mother's friend Mrs. Neelu Sharma, when she was in the midst of making dough. She put the flour in a large parath, made dent in the centre, poured the water in a stream with one hand and used the other hand in a brisk motion until she had gathered the dough into a non-sticky kneadable dough. Holding the parath with one hand, she folded her other hand into a fist and using her knuckles, kneaded the dough by pushing and stretching it for a few minutes until she had an elastic and silky smooth dough.
My mother is known in our family for her expertise in making triangular parathas. Smeared with a layer of ghee and jaggery or sugar or a layer of ghee and a spicy peanut chutney powder, and folded into a roll, they were one of my favourite childhood snacks.
A mail from a visitor asking me about grains, made me delve further into the subject of the relationship between grains and our health. In ancient India flour was always freshly ground and consumed the same day. Since this is not practical or possible today, I try to buy and use organic, stone ground wheat flour always which is the best bet in comparison to processed and packaged wheat flour manufactured in huge mills, sitting on the shelves of modern-day stores.
Roti/chapati/phulka Recipe
Use the quantity of water as a guide as flours vary in their capacity to absorb water depending on the humidity. Once you are comfortable with making the basic dough, there is endless scope for experiment by mixing in a variety of other flours, spices like cumin and carom seeds and minced herbs like mint or coriander.
Ingredients:
1 cup atta (whole wheat flour)
1/3 to ½ cup water (preferably lukewarm)
¼ tsp salt
Extra flour for rolling
Ghee or oil for cooking (optional)
Method:
For the dough:
Combine the flour and salt in a large bowl or an Indian parath. Pour in the water slowly, gathering the flour together until you get a soft and moist dough. Transfer it to a clean surface or platform (this is not required if using the parath) and knead the dough for about 5 to 6 minutes until you get a smooth, pliable dough. Cover the dough with a damp cloth and allow to rest for anytime between 10 minutes to ½ an hour.
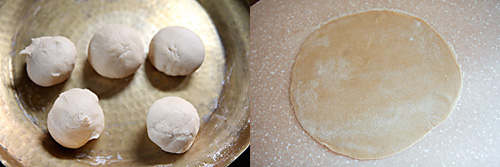
Divide the dough into 6 round balls.
With the help of a food processor:
This is super easy and takes only a few minutes to assemble. In a food processor fitted with a metal blade, add the dry ingredients. Process for a few seconds until the dry ingredients are uniform. With the machine running, add water little by little, until he flour begins to form into a mass. If the machine turns slow at any time, turn it off and mix the flour with the water. Turn on the machine and when the ball of dough has formed, process for about 20 to 25 times until it becomes smooth and pliable. Use as required.
To make Rotis:
In a small bowl place some atta or whole wheat flour.
Place a tava or a heavy cast iron griddle over medium heat. On a lightly floured surface, take one ball, dip it into the flour and roll it into a thin circle, about 5 ½â to 6 “ in diameter. You can use extra flour while rolling the dough to prevent the dough from sticking to the surface. However use as little as required, as too much flour will make the roti dry.
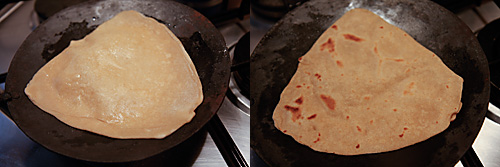
Knock the excess flour off the rolled dough by slapping it between your hands and place it on the preheated griddle.When small white bubbles appear on the surface of the roti, turn it over with a pair of tongs and cook until the surface bulges with air pockets. With the help of your tongs, lift the roti and toast on both sides over a direct flame for a few seconds until it puffs up. A well done roti is cooked and has golden brown spots on both sides.
If you don not want to puff your rotis over a direct flame, you can cook the roti by allowing it to stay on the griddle. Turn it over until cooked on both sides. And then gently press the top of the roti with a soft cloth or a flat spatula until the roti puffs up. This requires a little practice.
Brush the rotis with the optional ghee or melted butter and keep them in containers lined with cloth or thick paper towels.
To make Triangle Parathas:
Dip the round ball into flour and roll out into a 6" circular disc. Brush the open side lightly with oil.
Fold it into half and brush it lightly with oil again.
Fold the oiled side again to form a triangle. Dip the triangle into the flour and roll out to about 6". Cook on a griddle by following the instructions given above.
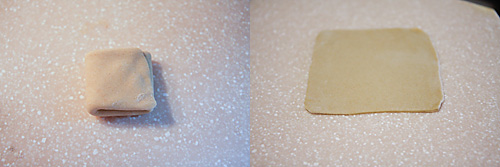
To make Square Parathas:
Dip the round ball into flour and roll out into a 6" circular disc. Brush the open side lightly with oil.
Fold one side of the disc towards the centre as shown. Fold the other side over the folded side. Bring the right side towards the centre as shown above.
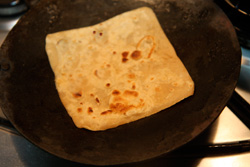
Fold the left side over the right side to form into a square. Roll on all four sides, carefully retaining the square shape.
Cook on a griddle by following the instructions given above.
Makes approximately 6 rotis or parathas.
To receive recipes, tips and inspiration that feeds your body, mind and soul subscribe to Divine Taste newsletter





very elaborately described.even a beginner can venture into cooking.
Wow… Wonderful post… awesome job!!
Good One….Nice Tips…
Lovely..I am dying to have these 🙁 we have electric hot plates here so cant prepare rotis..
Excellent post, I love the pictures also. We make all the shapes of the rotis you have put in your post.
I never knew about square parathas earlier. Great info!
Thanks for the historical notes and difference between all those types of wheat products. Interesting read.
I love the pictures of the wheat grain at the start of the post. I actually use the grain itself and grind it to a flour in my hand powered mill. Here are some picutres: http://mangosoup.blogspot.com/2009/08/making-chapatis-with-home-ground-wheat.html
It's not actually very difficult, and the chapatis have a wonderful flavour and are really soft.
you are so sweet to do this! i really needed the DETAILS, will mail you or post again if more questions come up! thanks 🙂
Should the dough be rested at room temperature or be placed in a refrigerator? I know for baking one must place the dough in the refrigerator in order for it develop a more complex flavor, just not sure what are the rules with chapati dough.
John: You can leave the dough to rest at room temperature. You could even place the dough in the refrigerator if you have left overs or want to prepare the dough ahead of time.
The best part of this dough is if you are in a hurry just use lukewarm water to make the dough and make the rotis right away. There is no need to rest the dough.
I love the parath. Can you let me know where I can find a similar one in Bangalore?
Its easy to get a degree of engineering than making Circular Roti.I tried whole night but I could not succeed. I think most of the male lack some harmone that's why they can't make beautiful circular Roti.
You might have written about circular parathas Just oil open (up) side Roll the circle like a mat or carpet then the roll be coiled like a snake Flatten it on dry flour & roll it into circles to make round parathas
Abhitesh: 🙂 Oh! That's sad!It's quite simple actually , you just need to practice it. Don't forget some of the or rather most of the best chefs in the world are men!
K M Prasad: That's one fo my favourite techniques. Thanks for sharing.
Tried the roti. Doesn't taste anything like roti. Followed directions to the T. In fact it was tasteless but easy to make.
Tricia: These are the Indian breads that are eaten regularly in Indian households. They are usually bland as they are served accompanied with flavourful vegetables, curries and gravies. If you are looking for the tandoori roti taste served in Indian hotels then this is not the recipe to try!
I have got the very good tips definately i will try to make the good roti / phulka / parathas to different shapes.
Thanks
will it work if u dont have a tawa
sosy: You can try a griddle!
Hey, as soon as i read this blog i went to the kitchen and made paratah..!
my bro liked it..! thanks!
Badoora: That's awesome!
My atta rotis always become rubbery when cold even tho I use the same method and knead it well. I rub a little oil on both sides and leave on tawa high heat. Wonder why
Yasmin: Try making a softer dough and cooking the rotis on medium low heat.
I like the valuable info you provide in your articles.
I will bookmark your weblog and check again here frequently.
I am quite sure I'll learn lots of new stuff right here! Good luck for the next!
i love the indian food
Wow really detailed.Helped alot
🙂
This is Great Article
Thanks for the recipe
i will try to cook it
[…] (Indian bread, goes good with curry, chicken or rice)Huge in the Caribbean countries of the Guianas.https://divinetaste.com/archives/how-to-make-basic-rotichapatiparatha-indian-flatbreads/ Curry (Green, red, potato, mango)Again, big in the Caribbean countries of the Guianas, goes well […]
One doubt
Is that healthier to hold the chapati onto direct flame ?
Pls clarify
It's the Indian way of making phulkas.
Please start a youtube channel and make these videos it would be really helpful….I can't explain in words what sort of joy finding this page has given to me I always wanted to learn satvik cooking and now I know where to get help ….plz if possible start a youtube channel 🥺🥺🥺
its very valuable information. Thank you for with us.
Thank you Aditi, god willing I will start a youtube channel.